

Lately, I have helped a lot of clients who have 5XX errors on SiteGround, especially eCommerce sites. If you are experiencing any 499, 500, 502, 503, and 504 errors on SiteGround, please know that they are very common. I know there is nothing more frustrating than having one's site down, especially if you do not know why! If your site is down, you are truly suffering:
- You lose those precious leads
- You lose revenue and real money whether via clients, ads, or purchases from your store
- You lose trust from your potential customers
- Your SEO rankings will drop because a site with poor uptime will less likely be available when the search needs it from a search results page
Look no further! In this article, I will explain what the error codes mean, some of the terms and relevant architecture, and outline my 15 steps of what I do to address these issues.
- Understanding 500 Errors
- Solving 500 Errors
- Understanding 499, 502, 503, & 504 Errors
- Understanding the Web Hosting Architecture
- What to Expect from Managed Hosting Support
- 15 Ways of Solving 499, 502, 503, & 504 Errors
- Summary
Why is it so difficult to fix the 5xx errors on SiteGround?
On SiteGround, the problems with even identifying the 5XXs are:
- No visibility provided by SiteGround on the number of 5XXs.
- Inability to access the logs in real time via SSH, which are 15-30min behind.
- No alerts to you or from the system of any 5XXs.
Essentially, you have absolutely zero ability to identify the 5XXs without SiteGround support which they have consistently answered, "Scale the hosting plan" (which obviously benefits them). SiteGround is not really motivated to suggest anything else, so besides suggesting external experts and recommending you scale your site, I doubt you will ever get anything else from their Support team.
As a side note, SiteGround is not 100% designed and optimized for WordPress like WP Engine (which solely and only hosts WordPress). Many managed hosts that may have originally been designed for WordPress have expanded to support other types of applications like Drupal and Joomla, which also uses the same technological stack. While it makes sense to do this, fine tuning for WordPress v. Drupal v. Joomla is still different albeit very small (but these nuances matter at scale). Only when a hosting company scales their hosting do these nuances begin to show themselves. Those managed hosting companies like Flywheel that use containers (probably Kubernetes) can still claim they maintain optimization for WordPress though they've expanded into other platforms.
Can You Just Solve This For Me!?
If you do not care about how to solve this, and just want someone to do this, you are looking at between $500–$3,000. With others, it may even cost you more as they may not have a strategic approach as I do. This sort of work is considered a troubleshooting task where you are paying based on the number of projected hours worked (and must pay hourly until solved with no guarantees). The strategy laid out below is a strategic plan that can be done as a service that will give you a level of satisfaction. If you are still interested, you can hire me immediately by contacting me directly or via Codeable.
Disclaimer
Please feel free to read this article and attempt to fix your site yourself at your own risk! Please note that I cannot be held liable for what you attempt to do on your own. If you attempt to do what is outlined here and mess up your site even further, it will most likely cost you even more monies to rectify and help you. So please, please create backups of everything before moving forward with attempting to fix things yourself or with hired help.
Understanding 500 Errors
A 500 is an Internal Server Error. The server has encountered a situation that it doesn't know how to handle, and usually a 500 error is more persistent.
All hosts handle this the same way and this issue is not really germane to just SiteGround. This is also known as the WordPress White Screen of Death (though that also occurred for other reasons too). The reason for these 500 errors can be limitless, but generally the primary cause is a plugin, a missing plugin/files, or some bad code somewhere.
Now what is problematic is that SiteGround calls all their errors 500 to the end user. You only see the actual error code though the access logs. All users get the error page pictured above that says 500 - Internal Error. So the actual error code could be any one of these: 499, 500, 502, 503, or 504; all of which mean something different to a developer.
So what do you do to solve your 500 issue(s)?
If you are on a managed host (e.g., SiteGround's Cloud Hosting, WP Engine, etc.), then simply revert to a previous installation/backup. This will be the easiest by far and will not require you to hire a developer. If you are more technical or daring...then you can try some of the recommendations below. Alternatively, you can hire me or another expert or contact me directly.
If this happened right after upgrading or activating a plugin, then you simply want to deactivate the plugin either via WordPress admin or WP CLI. To do this:
- via SFTP/FTP, simply go to the
wp-content/pluginsfolder and rename the plugin folder (e.g., frommy-plugintomy-plugin.bak) and log into the WordPress admin plugins page (wp-admin/plugins.php). Going to the plugins page will automatically deactivate the plugin (because it will be considered missing). - via WP CLI, at the root of the site (same place where wp-config.php is located), run
wp plugin deactivate my-plugin-slug. For more information, see WP CLI plugin command.
If this happened right after upgrading your theme, then you want to do something similar. To do this:
- via SFTP/FTP, simply go to the
wp-content/themesfolder and rename the plugin folder (e.g., frommy-themetomy-theme.bak) and log into the WordPress admin plugins page (wp-admin/themes.php). Going to the themes page will automatically activate the default theme giving you a notice that the active theme is broken. - via WP CLI, at the root of the site (same place where wp-config.php is located), run
wp theme install my-theme-slug --activate. For more information, see WP CLI theme command.
If you have access to the WordPress admin (meaning you can log into the site, access the plugins (wp-admin/plugins.php) and/or themes page (wp-admin/themes.php) and can install plugins.
- Go to the plugins page.
- Install the Health Check plugin.
- Begin troubleshooting mode via the Advanced.
- Enable your theme and check the site.
- Enable plugins one by one and check the site after every activation.
These methods will help you temporarily fix the issue and you may need to hire a developer or myself to completely fix this for you.
Understanding 499, 502, 503, & 504 Errors
There are four primary 5XX error codes that your server will be giving you: 499 Client Closed Request, 502 Bad Gateway, 503 Service Unavailable, and 504 Gateway Timeout.
- A 499 is Client Closed Request. This was originally a NGINX Error code to highlight that the client closed the request before the server could respond.
- A 502 is Bad Gateway. The server was acting as a gateway and received an invalid response from the upstream server.
- A 503 is Service Unavailable. The server is not ready to handle the request, generally as a result of being overloaded or down for maintenance.
- A 504 is Gateway Timeout. The server was acting as a gateway and did not receive a timely response from the upstream server.
There are several reasons that this is happening. First, you could be under a DDOS Attack of some kind. If this is the case, you need to implement Cloudflare or Sucuri ASAP. Second, you could have a surge in traffic that you were not expecting. Third, your resources (CPU/RAM) was not configured properly. Fourth and onward, too complicated to explain in this short-ish post.
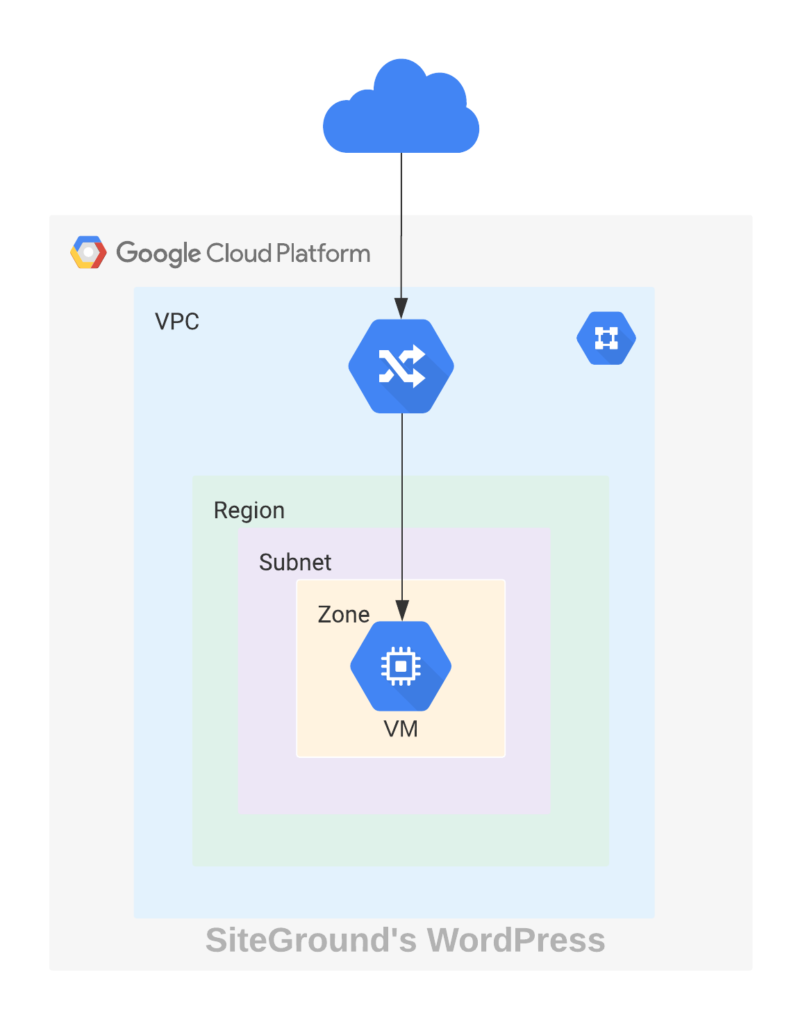
Understanding Web Hosting Architecture
So to prevent the 5XXs, you could scale out (or expand) your resources (which costs money always) or remove load off your server by offloading traffic. To understand what I mean by offloading traffic, you need to understand the general architecture of WordPress on managed hosting platforms. On SiteGround (and many other installations), you are generally dealing with these layers:
- Web Server layer (e.g., Apache) with an ingress (e.g., NGINX)
- (Optional) Caching layer
- Web Application layer (e.g., WordPress)
- Object Cache layer (e.g., memcached and/or in-memory)
- MySQL Database layer
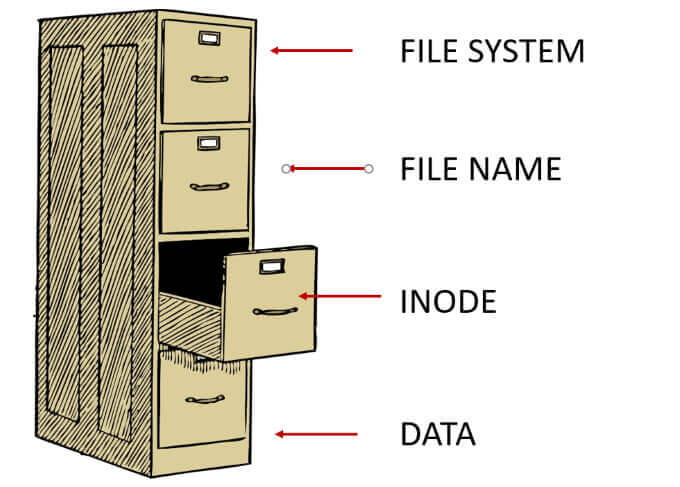
- Filesystem layer (see also Help Desk Geek's article on Inodes in Linux)
While I don't know SiteGround's architecture explicitly, I am fairly certain that SiteGround is using NGINX, Apache, memcached, and a database (MySQL or PostgreSQL) all on the same set of resources. There is no resource separation or isolation for preventing interference with one another (though I could be convinced that NGINX is separate from the resources as it appears to be a global thing). At scale, you would have each of these items isolated (and at super-scale a sharded MySQL, but you can ignore this as most WordPress sites don't need this level of scale).


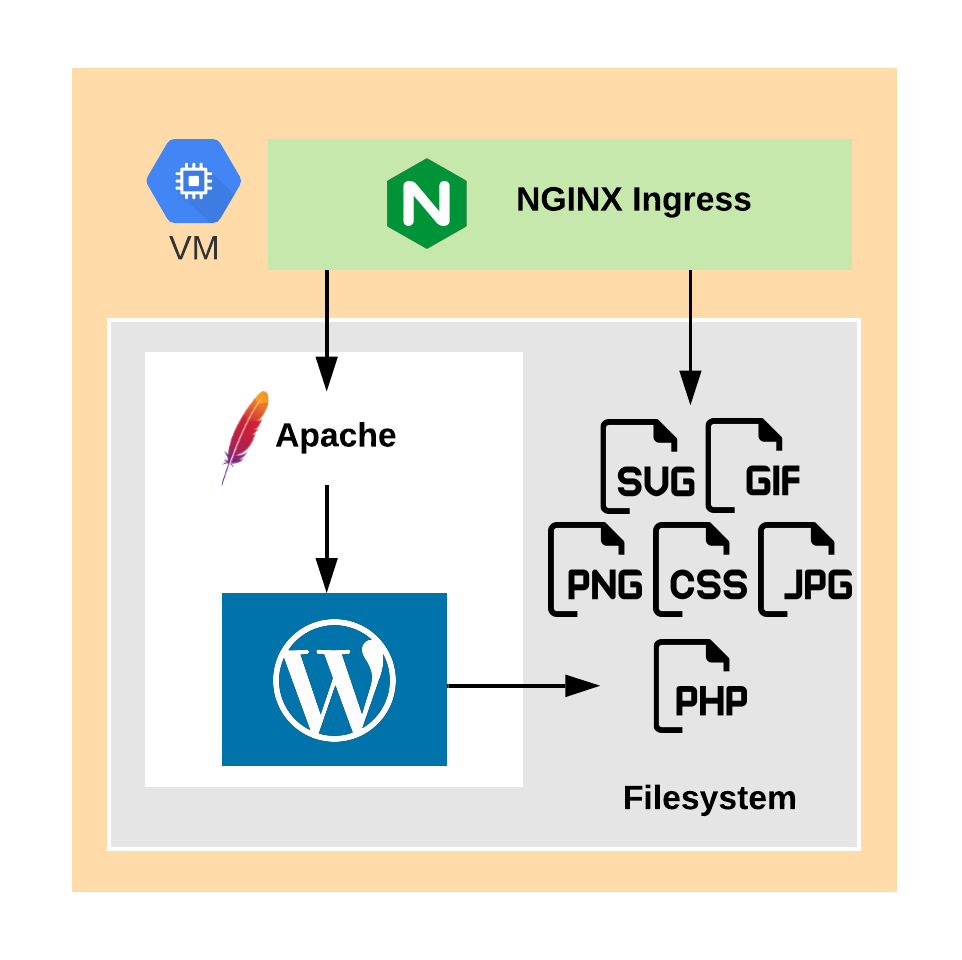
So far, I have derived the following sequence on SiteGround:
- Traffic enters the ecosystem via NGINX (called an ingress). If you have SG Optimizer installed and enabled/configured via the SiteTools Dashboard, then NGINX will respond at that layer for all static resources (e.g., images, JS, CSS, etc.). NGINX is much, much more performant for handling these requests than Apache.
- Traffic is then handed off to the site specific stack fronted by Apache as directed by
.htaccessfile. This will catch any and all static assets that missed (for whatever reason) the NGINX ingress. - If a caching plugin like SG Optimizer or WP Rocket is installed, then the cache may intercept the traffic and respond.
- If there is no cache or cache is bypassed (called a cache miss), traffic is then handed off to WordPress to process.
- WordPress will load all its core files, plugins and theme files depending on object cache and/or memcached (if configured properly on SiteGround either via SG Optimizer or other caching plugin) fetching from the MySQL DB as needed (autoloading all [or mostly all] options).
- The Filesystem returns all the files and data to be read by WordPress.

Here's a sequence diagram that may help...hopefully.
By default, SiteGround configures http2_idle_timeout and http2_recv_timeout to 600 seconds, and these are not changeable. Also by default, the max_execution_time of PHP is 120s, which is configurable via user.ini at the root of your site (same location as wp-config.php). So if you increase the max_execution_time to 600 or greater then you will eventually see 499s as opposed to 5XXs since NGINX will timeout before the PHP times out.
Next, you need to understand the most vulnerable parts of WordPress. Outside the known issues with load-scripts and load-styles, the most vulnerable parts of WordPress are:
- XMLRPC
- Login Page
- Admin Area
- Any theme/plugin
index.phpfiles
If you look at your access logs, you will find that bots, people, crawlers, scrapers, etc. will be hitting those URLs trying to gain access to your site...just because they can. So you want to mitigate those as soon as you are able.
What to Expect from Managed Hosting Technical Support
If you engage the SiteGround technical support, more than likely you will be referred to external WordPress experts, like myself. At best, they will tell you to scale your site with more RAM or CPU, which obviously helps them (and really doesn't solve the problem). Running a WooCommerce WordPress site on SiteGround should be able to run well with 3-4 CPUs and 6-8GB RAMs assuming you have the appropriate plugins, architecture and caching established.
Alternatively, technical support may tell you something like the site has high IOPS (input/output operations). Simply, IOPS are read/writes of the hard disk. IOPS is the reading of the various PHP files (plugins/themes and template files) as well as the writing of cache files and MySQL transactions in order to render the site. Higher IOPS also increases memory usage and in some occasions increases CPUs (but rarely with WordPress sites). In my experience, high IOPS is characteristic of many eCommerce sites and that’s one of the few problems and is a symptom of many other potential root causes. This data and debug information is useful if you have access to monitor these processes, which on a managed host like SiteGround, you do not have.
So what do you do to solve your 499, 502, & 503 issues?
Depending on your setup, the plan I would create may differ, but generally speaking you would need to take the following actions. I attempted to organize these actions in a somewhat logical order, but depending on the situation, I would do some tasks before other tasks. Also, while these items will work almost on any host, all examples will focus almost solely on SiteGround. These actions are:
- Analyze the Logs for 499s, 500s, 502s, 503s, & 504s
- Check PHP Version
- Run WP CLI’s Doctor Command
- Properly Configure a CDN
- Disable XMLRPC
- Control Bots
- Check Memory & Compute Utilization
- Configure Proper Cron Jobs
- Use Optimized Plugins
- Optimize the Database
- Offload All Emails
- Limit AJAX Usage
- Offload Images/Assets
- Analyze WP Actions & Filters
- Determine Cache Strategy
1. Analyze the Logs for 499s, 500s, 502s, 503s, & 504s
First and foremost, you want to check all the logs to see what is impeding or bogging down the server. This exercise is entirely exploratory and will only reveal further issues that need to be addressed. Based on work I have done so far, most of the time these will reveal issues that will be addressed in subsequent items (e.g., XML-RPC, bots, etc.). Sometimes, however, they reveal gems.
Access logs are in a gzipped file, so you need to inspect them using zcat. SSH into the site and check the logs. You can find them at www/domain.com/logs/. You can find all the errors by using one of these commands:
| # Search the gzipped file for 499s and all 5XXs. | |
| zcat domain.com-YYYY-MM-DD.gz | | |
| grep -P "\"\s((499)|(5\d+))\s" | |
| # Search for all 499s. | |
| zcat domain.com-YYYY-MM-DD.gz | grep "\" 499 " | |
| # Search for all 503s. | |
| zcat domain.com-YYYY-MM-DD.gz | grep "\" 500 " | |
| # Search for all 503s. | |
| zcat domain.com-YYYY-MM-DD.gz | grep "\" 503 " | |
| # Search for all 5XXs. | |
| zcat domain.com-YYYY-MM-DD.gz | | |
| grep -P "\"\s5\d+\s" |
As you work through the access logs, you will find a variety of pages that are the targets of various crawlers/bots and users. More than likely, the bots are causing most of the damage. If you have a WooCommerce site, you want to check the various Woo pages as well as their AJAX calls (via wc-ajax). Also, check your archive pages, your /feed/ pages, and the WP API (/wp-json/) URLs.
The format of a log entry at SiteGround is a bit different. SiteGround uses a Custom Log Format combining logs from Apache and NGINX. So, in the techy world it looks like this (if you're not techy, just skip this):
In human words, it is this:
| %h %l %u %t \"%r\" %>s %b \"%{Referer}i\" \"%{User-agent}i\" | TLS | | |
| $upstream_header_time $upstream_response_time $request_time | |
| $upstream_cache_status $nocache NC:$log_nocache BP:$log_cache_bypass |
| (IP Address) (identd of client or -) (userid of client or -) [ISO | |
| timestamp] "(HTTP METHOD) (Request URI) (HTTP Version)" (Status Code) | |
| (Object Size in bytes) "(Referer)" "(User Agent)" | (TLS Version) | | |
| (Upstream Header Time) (Upstream Response Time) (Request Time) (Cache | |
| Status = HIT|MISS|BYPASS) NC:(SG Specific Codes) (Binary 0/1 Cache Hit) |
For an explanation of the latter third see NGINX's Embedded Variables.
Here's a real example (with IP and domain obfuscated):
| 9.999.999.99 domain.com - [11/Aug/2020:14:29:37 +0000] "GET /path-to- | |
| my-awesome-page/ HTTP/1.1" 503 2676 "https://domain.com/my-awesome- | |
| blog/" "Mozilla/5.0 (Windows NT 6.1; Win64; x64; rv:79.0) | |
| Gecko/20100101 Firefox/79.0" | TLSv1.3 | 0.037 0.041 0.041 MISS | |
| W NC:000000 UP:1 |
Error Logs are currently only available via the SiteGround dashboard. According to the SiteGround Dashboard:
The error log displays the 300 most recent errors that have occurred when accessing your website over HTTP or HTTPS. Reviewing the error log can be useful for troubleshooting broken links, files and other errors.
However, this is not true at all. At the time of writing this post, they only show the 50 most recent errors. I did file a ticket with SiteGround and they have escalated the issue to their DevOps team but no timeline has been given as to when it will be fixed.
PHP Error Logs & WP Logs are only available via SSH or FTP. For PHP Error Logs, you will find a file like php_errorlog and potentially error_log in the folder where the PHP error occurred, which is somewhat annoying. So you want to find this via find . -name "php_errorlog" on the SSH command line or use the find function in your favorite FTP client.
For WP Logs, check wp-content/debug.log. If the file does not exist (and really should not on a production site), you want to temporarily enable WP_DEBUG in wp-config.php. This can even be done dynamically via:
| // Uncomment to enable WP_DEBUG. Of course, you want to change this cookie value to something else. | |
| //define( 'WP_DEVELOPER_COOKIE', 'V1AgRGV2ZWxvcGVyIGZvciBkb21haW4uY29tIGRlYnVnZ2luZyBwdXJwb3Nlcy4=' ); | |
| // Enable WP DEBUG if debug query parameter exists OR the "wp_developer" cookie exists with a specific value (WP_DEVELOPER_COOKIE). | |
| $wp_debug = ( | |
| isset( $_GET['debug'] ) || | |
| ( isset( $_COOKIE['wp_developer'] ) && defined( 'WP_DEVELOPER_COOKIE' ) && $_COOKIE['wp_developer'] == WP_DEVELOPER_COOKIE ) | |
| ); | |
| define( 'WP_DEBUG', $wp_debug ); | |
| define( 'WP_DEBUG_LOG', $wp_debug ); | |
| define( 'SCRIPT_DEBUG', $wp_debug ); | |
| // Enable WP DEBUG_DISPLAY if debug query parameter equals "display". | |
| define('WP_DEBUG_DISPLAY', ( $wp_debug && isset( $_GET['debug'] ) && ( 'display' === $_GET['debug'] ) )); |
The way this work is probably self-evident but it is a method that I use on the majority of the sites I do any development. It's a great and secure method to never have to edit wp-config.php continually.
If you are thinking, "Ok, I realize this is too much for me," you can hire a developer or myself to help you through this.
2. Check PHP Version
If you are on SiteGround, more than likely you are on the Managed PHP version and are on the latest version of PHP, but it's worth a check. PHP 7.x provides more performance and security than PHP 5.x. You can check your PHP version in SiteTools > Devs > PHP Manager (https://tools.siteground.com/php-settings).
3. Run WP CLI's Doctor Command
By default, WP CLI is installed on the server, but the doctor command is not. So first you will need to install the WP CLI doctor command via wp package install git@github.com:wp-cli/doctor-command.git and then run wp doctor check --all at the root of the WordPress site (same location as wp-config.php) and examine those issues to fix. I use a custom yaml configuration for my magic fixes and to automate some of the items listed in this longer-than-expected blog post.
| wp package install git@github.com:wp-cli/doctor-command.git | |
| wp doctor check --all | |
| Running checks 100% [=================================================================================] 4:19 / 0:05 | |
| +----------------------------+---------+--------------------------------------------------------------------+ | |
| | name | status | message | | |
| +----------------------------+---------+--------------------------------------------------------------------+ | |
| | core-verify-checksums | success | WordPress verifies against its checksums. | | |
| | file-eval | success | All 'php' files passed check for 'eval\(.*base64_decode\(.*'. | | |
| | cache-flush | warning | Use of wp_cache_flush() detected. | | |
| | autoload-options-size | success | Autoloaded options size (531.1kb) is less than threshold (900kb). | | |
| | constant-savequeries-falsy | success | Constant 'SAVEQUERIES' is undefined. | | |
| | constant-wp-debug-falsy | success | Constant 'WP_DEBUG' is defined falsy. | | |
| | core-update | success | WordPress is at the latest version. | | |
| | cron-count | success | Total number of cron jobs is within normal operating expectations. | | |
| | cron-duplicates | success | All cron job counts are within normal operating expectations. | | |
| | option-blog-public | success | Site is public as expected. | | |
| | plugin-active-count | success | Number of active plugins (13) is less than threshold (80). | | |
| | plugin-deactivated | success | Less than 40 percent of plugins are deactivated. | | |
| | plugin-update | success | Plugins are up to date. | | |
| | theme-update | success | Themes are up to date. | | |
| | php-in-upload | success | No PHP files found in the Uploads folder. | | |
| | language-update | success | Languages are up to date. | | |
| +----------------------------+---------+--------------------------------------------------------------------+ |
4. Properly Configure a CDN
In order to prevent load from reaching your server, you must establish a solid caching strategy including browser cache and an edge cache via configuring a CDN. It is the easiest and fastest way to prevent useless load on your server which reduces 499, 503 and 504 errors. I always recommend that clients either use Cloudflare or Fastly (if you're OpenSource software, Fastly will front your site for free).
Implement the free version of Cloudflare (personally, I would do this at Cloudflare and not via SiteGround). Within Cloudflare, enhance security around /wp-login.php* and /wp-admin/*, geofence /wp-admin, and set the browser cache of general assets to a few months or even a year and the edge cache to a month or two.
I always recommend paying for Cloudflare Pro minimally. This gives you image optimization out-of-the-box, plus more rules. Alternatively, you can use something like Optimole.
5. Disable XML-RPC
What is XML-RPC?
XML-RPC on WordPress is an interface that allows apps and other services the ability to talk to your WordPress site to do any of the following:
- Publish, Edit, or Delete a Post
- Upload a new file (e.g. an image for a post)
- List or Edit Comments
Because of these capabilities, it is a potential security vulnerability and open for an attack. Most websites today do not use the capabilities offered via XML-RPC especially since the WP API has been released.
I always recommend simply disabling XML-RPC and block access to xmlrpc.php via .htaccess and/or Cloudflare. Blocking at Cloudflare will reduce load on the server altogether and blocking at .htaccess will reduce load on the processing of the web application (i.e., WordPress).
| # BEGIN Custom | |
| # Block XMLRPC - Security. | |
| <Files xmlrpc.php> | |
| order deny,allow | |
| deny from all | |
| </Files> | |
| # END Custom |
6. Control the Bots
While resistance may be futile when it comes to bots, you do want to attempt to control them in some way that benefits your site and your audience. If the bots are hitting your site/server so hard that you cannot even serve your true customers, what benefit is for you to have these bots index your site? None because they will penalize you for being down. So preventing bots from hitting your sites primarily addresses 499s and some of the 500s errors as some of these errors are not appropriately identified on SiteGround.
Good Bots: If you are running an eCommerce site, you most likely will want to redirect all bots away from adding items to their cart as identified by ?add-to-cart in the access logs; even good bots like bingbot, googlebot, ahrefs, semrush, and others do this. On SiteGround, to find out what these are simply go to the logs and execute:
zcat domain.com-YYYY-MM-DD.gz | grep "bot" | grep "?add-to-cart"
Please note, that these good bots may also cause a server load on your site. Generally, I would recommend delaying the bots that are not important to you. If googlebot is causing you issues, you can set its delay in the Google Search Console.
| User-agent: mj12bot | |
| crawl-delay: 10 | |
| User-agent: ahrefs | |
| crawl-delay: 10 |
Bad Bots: Block all bad bots via .htaccess or via Cloudflare Pro. You can access this Bad Bots list to see all the bad bot user agents.
7. Check the Memory (RAM) and Compute (CPU) Utilization
There are two things you want to enable with your memory and CPU: one via WordPress and the other via SiteGround Dashboard.
- Increase WordPress PHP Memory Limit via a define statement in
wp-config.php.define( 'WP_MEMORY_LIMIT', '1024M' ); - Enable CPU and RAM Autoscaling on SiteGround ($$). You can do this in your site's account (URL will be something like https://my.siteground.com/services/hosting/{SOME-CRAZY-ID}/autoscale). In order to prevent all 5XX errors, this must be enabled. Any hosting company that offers auto-scaling, no matter how good or bad it is, a site owner should always elect to use it.
8. Configure Proper Cron Jobs
By default the WordPress cron is run by the wp_cron() function, which is hooked to run on the init hook, which runs on every page load. Disable WP Cron via a define statement in wp-config.php:define( 'DISABLE_WP_CRON', true );
Then, setup a "true" cron job via the SiteGround SiteTools Dashboard, Pingdom, or Uptime Robot.
9. Use Optimized Plugins
Plugins are great, after all, "There's a plugin for that!" However, plugins can cause massive problems if they are not designed well or use too much compute from the server. So let's take a look at a few plugin categories: Caching Plugins, Security Plugins, BackupPlugins, and Related PostsPlugins.
Caching Plugins: Properly configure either SG Optimizer. If you want something with more control and settings, install and configure WP Rocket. Using WP Rocket renders SG Optimizer useless (because WP Rocket has logic inside the plugin to mitigate SG Optimizer), so you will need to implement memcached yourself, and you will need to be sure to install the No Cache for Administrators Add-on.
Security Plugins: Some security plugins are resource hogs and Wordfence is one of those. If you are using Wordfence, uninstall it, install Limited Login Attempts Reloaded, and use Cloudflare Pro and/or Sucuri as a web application firewall (WAF); both Cloudflare and Sucuri are $20/mo.
Backup Plugins: SiteGround backs-up your files and DB daily which appear to run around 8am UTC time. To verify, go to your Backups in the SiteGround Dashboard via SiteTools > Security > Backups (https://tools.siteground.com/backup-restore) and note the time, which will be in your timezone. So, you really do not need a backup plugin.
Server Plugins: Broken Link Checker is a notoriously awful plugin to run on your server. So I always recommend only using it when you have to use it and then uninstall it. Also for emails, use a plugin like WP SMTP where you can offload your server emails to another service. Not only does this remove server load, it removes server responsibility and ensures your IP doesn't get blacklisted by Google's servers (which are also connected with Gmail analyzing bad email actors).
Related Posts Plugins: Most of these plugins are horrible and hog resources. Simply, do not use and uninstall SEO Auto Links & Related Posts, Yet Another Related Posts Plugin, Similar Posts, & Contextual Related Posts. Instead you want to use a related posts plugin that does all its compute offsite (e.g., Bibblio Related Posts, Jetpack Related Posts, Related Posts for WordPress, Outbrain, Contextly).
For a list of plugins, you should never use, see WP Engine's Disallowed Plugin List. If you are not hosted on WP Engine, then you can ignore Duplicate Behavior Plugins section.
Finally, always remove plugins that you are not using, even if you use them periodically.
10. Optimize the Database
Before you do anything with the database, always create a backup! Always!
wp doctor will check your database (DB) for the size of your auto-loaded options and recommends that it be below 900kb (by default). You can also use wp db optimize to further optimize the DB. To reduce the database, I use WordPress Advanced Database Cleaner to do find orphaned options, etc.
Generally speaking, if the DB is good according to the doctor, then I do nothing. If it is not, then I will take action. However, the WordPress DB can almost always be optimized further. If this is interesting to you, I'd advise you to hire a MySQL DB administrator to help you think this through.
11. Offload All Emails
Many hosting companies offer email hosting with their plans, and SiteGround is one of those companies. SiteGround's email hosting leverages RoundCube for its webmail client. This also creates load on your server resources, and IMHO, always, always offload email hosting to another third party like Google Suite, Microsoft Office 365, ZohoMail, Greatmail or even hey.com.
Also, WordPress sends out emails (e.g., user registration, forgot password, reset password, etc.). WordPress should be configured via WP Mail SMTP to send emails using a third party service like SendGrid, Google Suite, Sendinblue, or Mailgun.
Offloading email from your server will free compute (because monitoring, logging, etc. on those processes are not required) and ensure that your servers are not blacklisted or blocked as a result of some sort of email hack or mass email blasts.
12. Limit AJAX Usage
AJAX creates an awesome user experience, and if improperly implemented can also create a detrimental user experience. When considering AJAX, the tradeoff is simple: UX v. Server Costs/Uptime. In order to determine this, you need some good marketing analytics and probably some A/B testing with server correlations (which is fairly difficult to do correctly).
Themes/Plugins
Many themes and plugins use AJAX to improve the user experience (UX). The problem with WordPress's AJAX is that it is not cached by default because it is accessing wp-admin/admin-ajax.php. Most caching plugins ignore /wp-admin/ in its caching, and generally speaking AJAX functions IMHO should only be for custom, personalized functionality; for all else, use the WP REST API (which is usually cached by default).
WooCommerce
WooCommerce uses AJAX a ton; or rather they can and do by default. WooCommerce has also implemented their own AJAX endpoints instead of the standard admin-ajax.php (good, bad or indifferent). The Add to Cart AJAX (via /?wc-ajax=add_to_cart) isn't so bad, but the Cart Fragments (via /?wc-ajax=get_refreshed_fragments) can be quite detrimental to your server (and even possibly Google PageSpeed Insights; though I am not convinced that it is blocking).
WooCommerce's Cart Fragments is extremely hard on the server as it was built without caching in mind. This is because they hash every cart and every cart item as well as using nonces to remove items (for security purposes most likely). It would be easier for Woo/Automattic to re-create and develop cart fragments with statelessness in mind (than doing it yourself in Woo's software pattern). But I doubt they will fix this. Additionally, most eCommerce sites have the cart on every page, including the About page of a site.
Here is an example after adding one item to the cart:
| <div class="widget_shopping_cart_content"> | |
| <ul class="woocommerce-mini-cart cart_list product_list_widget"> | |
| <li class="woocommerce-mini-cart-item mini_cart_item"> | |
| <a aria-label="Remove this item" class="remove remove_from_cart_button" data-cart_item_key="abcdef12345some00hash67890uvwxyz" data-product_id="9999" data-product_sku="GRA000010" href="https://example.com?remove_item=abcdef12345some00hash67890uvwxyz&_wpnonce=f5e62f5167">×</a> <a href="https://example.com/product/some-product"><img alt="" class="attachment-woocommerce_thumbnail size-woocommerce_thumbnail" height="300" sizes="(max-width: 300px) 100vw, 300px" src="https://assets.example.com/shop/YYYY/MM/####/some-image-300x300.jpg" srcset="https://assets.example.com/shop/YYYY/MM/####/some-image-300x300.jpg 300w, https://assets.example.com/shop/YYYY/MM/####/some-image-150x150.jpg 150w, https://assets.example.com/shop/YYYY/MM/####/some-image-180x180.jpg 180w, https://assets.example.com/shop/YYYY/MM/####/some-image-600x600.jpg 600w, https://assets.example.com/shop/YYYY/MM/####/some-image-100x100.jpg 100w" width="300">Some Product</a> <span class="quantity">1 × <span class="woocommerce-Price-amount amount"><span class="woocommerce-Price-currencySymbol">£</span>10.00</span></span> | |
| </li> | |
| </ul> | |
| <p class="woocommerce-mini-cart__total total"><strong>Subtotal:</strong> <span class="woocommerce-Price-amount amount"><span class="woocommerce-Price-currencySymbol">£</span>10.00</span></p> | |
| <p class="woocommerce-mini-cart__buttons buttons"><a class="button wc-forward" href="https://example.com">View cart</a><a class="button checkout wc-forward" href="https://example.com">Checkout</a></p> | |
| </div> |
| <div class="widget_shopping_cart_content"> | |
| <ul class="woocommerce-mini-cart cart_list product_list_widget"> | |
| <li class="woocommerce-mini-cart-item mini_cart_item"> | |
| <a aria-label="Remove this item" class="remove remove_from_cart_button" data-cart_item_key="abcdef12345some00hash67890uvwxyz" data-product_id="9999" data-product_sku="GRA000010" href="https://example.com?remove_item=abcdef12345some00hash67890uvwxyz&_wpnonce=f5e62f5167">×</a> <a href="https://example.com/product/some-product"><img alt="" class="attachment-woocommerce_thumbnail size-woocommerce_thumbnail" height="300" sizes="(max-width: 300px) 100vw, 300px" src="https://assets.example.com/shop/YYYY/MM/####/some-image-300x300.jpg" srcset="https://assets.example.com/shop/YYYY/MM/####/some-image-300x300.jpg 300w, https://assets.example.com/shop/YYYY/MM/####/some-image-150x150.jpg 150w, https://assets.example.com/shop/YYYY/MM/####/some-image-180x180.jpg 180w, https://assets.example.com/shop/YYYY/MM/####/some-image-600x600.jpg 600w, https://assets.example.com/shop/YYYY/MM/####/some-image-100x100.jpg 100w" width="300">Some Product</a> <span class="quantity">1 × <span class="woocommerce-Price-amount amount"><span class="woocommerce-Price-currencySymbol">£</span>10.00</span></span> | |
| </li> | |
| <li class="woocommerce-mini-cart-item mini_cart_item"> | |
| <a aria-label="Remove this item" class="remove remove_from_cart_button" data-cart_item_key="uvwxyz12345some00hash67890abcdef" data-product_id="9998" data-product_sku="GRA000011" href="https://example.com?remove_item=uvwxyz12345some00hash67890abcdef&_wpnonce=f5e62f5167">×</a> <a href="https://example.com/product/some-other-product"><img alt="" class="attachment-woocommerce_thumbnail size-woocommerce_thumbnail" height="300" sizes="(max-width: 300px) 100vw, 300px" src="https://assets.example.com/shop/YYYY/MM/####/some-other-image-300x300.jpg" srcset="https://assets.example.com/shop/YYYY/MM/####/some-other-image-300x300.jpg 300w, https://assets.example.com/shop/YYYY/MM/####/some-other-image-150x150.jpg 150w, https://assets.example.com/shop/YYYY/MM/####/some-other-image-180x180.jpg 180w, https://assets.example.com/shop/YYYY/MM/####/some-other-image-600x600.jpg 600w, https://assets.example.com/shop/YYYY/MM/####/some-other-image-100x100.jpg 100w" width="300">Some Other Product</a> <span class="quantity">1 × <span class="woocommerce-Price-amount amount"><span class="woocommerce-Price-currencySymbol">£</span>10.00</span></span> | |
| </li> | |
| </ul> | |
| <p class="woocommerce-mini-cart__total total"><strong>Subtotal:</strong> <span class="woocommerce-Price-amount amount"><span class="woocommerce-Price-currencySymbol">£</span>20.00</span></p> | |
| <p class="woocommerce-mini-cart__buttons buttons"><a class="button wc-forward" href="https://example.com">View cart</a><a class="button checkout wc-forward" href="https://example.com">Checkout</a></p> | |
| </div> |
Here is an example after adding a second item to the cart:
| <div class="widget_shopping_cart_content"> | |
| <ul class="woocommerce-mini-cart cart_list product_list_widget"> | |
| <li class="woocommerce-mini-cart-item mini_cart_item"> | |
| <a aria-label="Remove this item" class="remove remove_from_cart_button" data-cart_item_key="abcdef12345some00hash67890uvwxyz" data-product_id="9999" data-product_sku="GRA000010" href="https://example.com?remove_item=abcdef12345some00hash67890uvwxyz&_wpnonce=f5e62f5167">×</a> <a href="https://example.com/product/some-product"><img alt="" class="attachment-woocommerce_thumbnail size-woocommerce_thumbnail" height="300" sizes="(max-width: 300px) 100vw, 300px" src="https://assets.example.com/shop/YYYY/MM/####/some-image-300x300.jpg" srcset="https://assets.example.com/shop/YYYY/MM/####/some-image-300x300.jpg 300w, https://assets.example.com/shop/YYYY/MM/####/some-image-150x150.jpg 150w, https://assets.example.com/shop/YYYY/MM/####/some-image-180x180.jpg 180w, https://assets.example.com/shop/YYYY/MM/####/some-image-600x600.jpg 600w, https://assets.example.com/shop/YYYY/MM/####/some-image-100x100.jpg 100w" width="300">Some Product</a> <span class="quantity">1 × <span class="woocommerce-Price-amount amount"><span class="woocommerce-Price-currencySymbol">£</span>10.00</span></span> | |
| </li> | |
| </ul> | |
| <p class="woocommerce-mini-cart__total total"><strong>Subtotal:</strong> <span class="woocommerce-Price-amount amount"><span class="woocommerce-Price-currencySymbol">£</span>10.00</span></p> | |
| <p class="woocommerce-mini-cart__buttons buttons"><a class="button wc-forward" href="https://example.com">View cart</a><a class="button checkout wc-forward" href="https://example.com">Checkout</a></p> | |
| </div> |
| <div class="widget_shopping_cart_content"> | |
| <ul class="woocommerce-mini-cart cart_list product_list_widget"> | |
| <li class="woocommerce-mini-cart-item mini_cart_item"> | |
| <a aria-label="Remove this item" class="remove remove_from_cart_button" data-cart_item_key="abcdef12345some00hash67890uvwxyz" data-product_id="9999" data-product_sku="GRA000010" href="https://example.com?remove_item=abcdef12345some00hash67890uvwxyz&_wpnonce=f5e62f5167">×</a> <a href="https://example.com/product/some-product"><img alt="" class="attachment-woocommerce_thumbnail size-woocommerce_thumbnail" height="300" sizes="(max-width: 300px) 100vw, 300px" src="https://assets.example.com/shop/YYYY/MM/####/some-image-300x300.jpg" srcset="https://assets.example.com/shop/YYYY/MM/####/some-image-300x300.jpg 300w, https://assets.example.com/shop/YYYY/MM/####/some-image-150x150.jpg 150w, https://assets.example.com/shop/YYYY/MM/####/some-image-180x180.jpg 180w, https://assets.example.com/shop/YYYY/MM/####/some-image-600x600.jpg 600w, https://assets.example.com/shop/YYYY/MM/####/some-image-100x100.jpg 100w" width="300">Some Product</a> <span class="quantity">1 × <span class="woocommerce-Price-amount amount"><span class="woocommerce-Price-currencySymbol">£</span>10.00</span></span> | |
| </li> | |
| <li class="woocommerce-mini-cart-item mini_cart_item"> | |
| <a aria-label="Remove this item" class="remove remove_from_cart_button" data-cart_item_key="uvwxyz12345some00hash67890abcdef" data-product_id="9998" data-product_sku="GRA000011" href="https://example.com?remove_item=uvwxyz12345some00hash67890abcdef&_wpnonce=f5e62f5167">×</a> <a href="https://example.com/product/some-other-product"><img alt="" class="attachment-woocommerce_thumbnail size-woocommerce_thumbnail" height="300" sizes="(max-width: 300px) 100vw, 300px" src="https://assets.example.com/shop/YYYY/MM/####/some-other-image-300x300.jpg" srcset="https://assets.example.com/shop/YYYY/MM/####/some-other-image-300x300.jpg 300w, https://assets.example.com/shop/YYYY/MM/####/some-other-image-150x150.jpg 150w, https://assets.example.com/shop/YYYY/MM/####/some-other-image-180x180.jpg 180w, https://assets.example.com/shop/YYYY/MM/####/some-other-image-600x600.jpg 600w, https://assets.example.com/shop/YYYY/MM/####/some-other-image-100x100.jpg 100w" width="300">Some Other Product</a> <span class="quantity">1 × <span class="woocommerce-Price-amount amount"><span class="woocommerce-Price-currencySymbol">£</span>10.00</span></span> | |
| </li> | |
| </ul> | |
| <p class="woocommerce-mini-cart__total total"><strong>Subtotal:</strong> <span class="woocommerce-Price-amount amount"><span class="woocommerce-Price-currencySymbol">£</span>20.00</span></p> | |
| <p class="woocommerce-mini-cart__buttons buttons"><a class="button wc-forward" href="https://example.com">View cart</a><a class="button checkout wc-forward" href="https://example.com">Checkout</a></p> | |
| </div> |
As you can see get_refreshed_fragments refreshes the entire cart. This makes it nearly impossible to cache well. If the response was broken down to the smaller items (e.g., mini_cart_item) then it can be cached. Otherwise, you cannot cache this due to the hashes and well, you don't want everyone buying the same thing...unless you do (well I guess you may be able to pull this off if you only have one item with no variations, etc.).
So what do you do? If you are struggling with server load and want something simple and fast, just do these 4 things:
- Disable AJAX add to cart buttons on archives,
- Redirect customers to the cart upon adding items,
- Remove cart fragments, and
- Remove all cart widgets

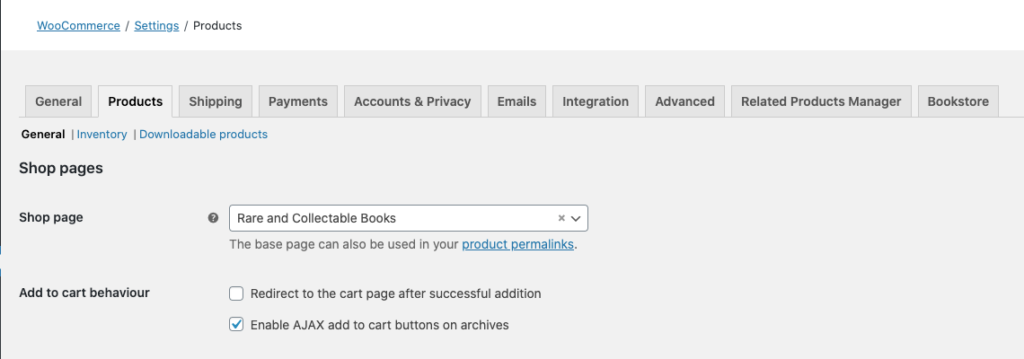
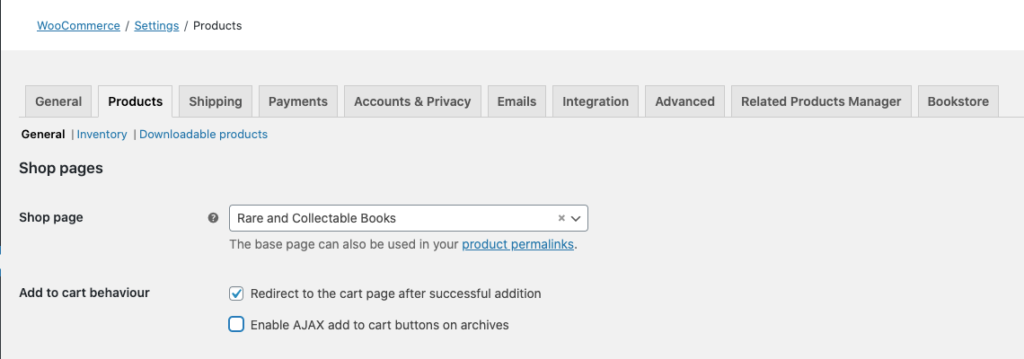
To disable AJAX add to cart buttons on archives,
within WooCommerce > Products, beside Add to cart behaviour uncheck Enable AJAX add to cart buttons on archives.
To redirect customers to the cart upon adding items,
within WooCommerce > Products, beside Add to cart behaviour check Redirect to the cart page after successful addition.
To remove cart fragments,
you can use a plugin or custom code within your theme's functions.php (or even better as a basic custom plugin). If you do disable cart fragments, be sure to enable Add to cart behavior's Redirect to the cart page after successful addition.
Within functions.php, you can add one of these snippets:
Disable cart fragments on the front page only:
| add_action( 'wp_enqueue_scripts', 'prefix_dequeue_woocommerce_cart_fragments_front_page', 11 ); | |
| /** | |
| * Disable WooCommerce Cart Fragments from front page. | |
| */ | |
| function prefix_dequeue_woocommerce_cart_fragments_front_page() { | |
| if ( is_front_page() ) { | |
| wp_dequeue_script( 'wc-cart-fragments' ); | |
| } | |
| } |
Disable cart fragments everywhere except WooCommerce shop pages:
| add_action( 'wp_enqueue_scripts', 'prefix_dequeue_all_woocommerce_styles_scripts_non_shop_pages', PHP_INT_MAX ); | |
| /** | |
| * Disable all WooCommerce styles and scripts everywhere except WooCommerce pages. | |
| */ | |
| function prefix_dequeue_all_woocommerce_styles_scripts_non_shop_pages() { | |
| if ( function_exists( 'is_woocommerce' ) ) { | |
| if ( ! is_woocommerce() && ! is_cart() && ! is_checkout() ) { | |
| // Styles | |
| wp_dequeue_style( 'woocommerce-general' ); | |
| wp_dequeue_style( 'woocommerce-layout' ); | |
| wp_dequeue_style( 'woocommerce-smallscreen' ); | |
| wp_dequeue_style( 'woocommerce_frontend_styles' ); | |
| wp_dequeue_style( 'woocommerce_fancybox_styles' ); | |
| wp_dequeue_style( 'woocommerce_chosen_styles' ); | |
| wp_dequeue_style( 'woocommerce_prettyPhoto_css' ); | |
| // Scripts | |
| wp_dequeue_script( 'wc_price_slider' ); | |
| wp_dequeue_script( 'wc-single-product' ); | |
| wp_dequeue_script( 'wc-add-to-cart' ); | |
| wp_dequeue_script( 'wc-cart-fragments' ); | |
| wp_dequeue_script( 'wc-checkout' ); | |
| wp_dequeue_script( 'wc-add-to-cart-variation' ); | |
| wp_dequeue_script( 'wc-single-product' ); | |
| wp_dequeue_script( 'wc-cart' ); | |
| wp_dequeue_script( 'wc-chosen' ); | |
| wp_dequeue_script( 'woocommerce' ); | |
| wp_dequeue_script( 'prettyPhoto' ); | |
| wp_dequeue_script( 'prettyPhoto-init' ); | |
| wp_dequeue_script( 'jquery-blockui' ); | |
| wp_dequeue_script( 'jquery-placeholder' ); | |
| wp_dequeue_script( 'fancybox' ); | |
| wp_dequeue_script( 'jqueryui' ); | |
| } | |
| } | |
| } |
Using a plugin, you can disable Cart Fragments with the Disable Cart Fragments plugin, with TrimPress (which also does many other things), or Perfmatter's Premium Plugin. Some have had success with using WP Menu Cart as an alternative to the default Woo Cart.
The great thing about the Disable Cart Fragments is that you can selectively disable cart fragments.
| // Disable via comma-separated page/post IDs. | |
| define('DISABLE_CART_FRAGMENTS', '123,456,789'); |
Cart Fragments Reimagined Plugin Sponsorship
If one wants to sponsor the creation of a custom plugin with a custom cart fragments implementation in order to cacheability, improve performance and server load, I would be excited for the opportunity. The cost to do this would be the equivalent of having a custom plugin created. I would love to be funded by someone to create an extension for WooCommerce that does this properly and correctly.
WooCommerce Reports
One of the hidden costs of WooCommerce is the async (or on-demand) reporting computations for the WooCommerce MailChimp integration and WooCommerce reports. This can place a massive load on your server. To fix this you need to disable the amount of the user's spend and/or move get_total_spend() post meta data to its own custom DB table. To do both, you can use my plugin or to do just disable the amount of a user's spend:
| add_action( 'init', 'stop_heartbeat', 1 ); | |
| /** | |
| * Stop the heartbeat altogether. | |
| */ | |
| function stop_heartbeat() { | |
| wp_deregister_script( 'heartbeat' ); | |
| } |
To limit the heartbeat, install WP Heartbeat Control. You can then set different intervals for each page type or even disable it for some pages.
13. Offload Images/Assets ($$)
Offloading your images from your server does three things:
- Reduces load (CPU) on the server.
- Reduces bandwidth from the server.
- Reduces storage space used on the server.
Space on the server is a hidden cause of 5XX errors. It prevents new cache files from being written, prevents new server processes from being started creating a bottleneck, and potentially increases IOPs and thus death for some requests.
Since hosting companies charge based on bandwidth, CPU/RAM, and storage space, any reductions in these items will save you money and will allow you downgrade your hosting plan (though on SiteGround to reduce SSD space, you actually have to purchase a new server, migrate and cancel the old one which is a lot of fun).
The cost of AWS S3 is quite minimal even beyond the free tier. For example, if you have 100GB of storage and had 1 million requests for those assets (e.g., images, CSS, JS files), it would only cost you about $5 USD/month. AWS S3 is cheaper than any hosting plan's SSD space. If you have a lot of images, then you may want to offload them via a script, which I am happy to do for you!
I highly recommend you do offload your images from your server via WP Offload Media to AWS S3 (or DigitalOcean Spaces or Google Cloud Storage) connected with Cloudflare to a custom domain (e.g., assets.domain.com). It also has an add-on that will pull other site assets to be delivered via S3.
For sites with a lot of media assets, the pricing structure of the WP Offload Media plugin is very, very disappointing, but there are ways around this. If you are hosted on SiteGround, more than likely you are going to need some help to properly offload those images.
14. Analyze the WordPress Actions & Filters
When troubleshooting a WordPress site, I immediately install a set of plugins:
- Debug Bar + some add-ons.
- Query Monitor
- WP Crontrol
- Transients Manager
You can install these plugins via the WP CLI.
| wp install --skip-themes --skip-plugins \ | |
| debug-bar \ | |
| debug-bar-actions-and-filters-addon \ | |
| debug-bar-super-globals \ | |
| debug-bar-slow-actions \ | |
| health-check \ | |
| query-monitor \ | |
| wp-crontrol \ | |
| transients-manager |
These plugins will provide a vast amount information about the site. Of particular focus will be the number of queries, duplicate queries, and query times.
As a side note: Generally, when I am debugging a site, I have almost all the Debug Bar plugins installed. Depending on the issue I install all of or a subset of the following plugins: Debug Bar, Debug Bar Actions & Filters Addon, Debug Bar Console, Debug Bar Constants, Debug Bar Cron, Debug Bar Custom Info, Debug Bar Extender, Debug Bar Hook Log, Debug Bar List Script & Style Dependencies, Debug Bar Localization, Debug Bar Plugin Activation, Debug Bar Post Meta, Debug Bar Post Types, Debug Bar Query Count Alert, Debug Bar Query Tracer, Debug Bar Remote Requests, Debug Bar Rewrite Rules, Debug Bar Roles & Capabilities, Debug Bar Screen Info, Debug Bar Shortcodes, Debug Bar - Sidebars & Widgets, Debug Bar Slow Actions, Debug Bar Super Globals, Debug Bar Taxonomies, Debug Bar Tracer, Debug Bar Transients, and Debug Bar Widgets. Besides these, I also usually install WP Crontrol, Transients Manager, and Query Monitor. If the issue is URL routing, I also like to use Rewrite Rules Inspector.
15. Determine Your Caching Strategy
Finally and most importantly, you want to determine your caching strategy. My philosophy is simply cacheAllTheThings();. To really understand this section, you should have read the architecture section. If you didn't please scroll back up to read it.
First, why cache?
Simply, you should always cache. Ok, but why? As we mentioned above, one primary reason is to offload work from the server. Another reason is performance. If a request is cached at the browser, that experience is super awesome and fast. If a request has to go all the way back to origin, that will always be much longer.
SiteGround uses Google Cloud, so your origins will be in one of these locations. Let's take a concrete example. Let's say your origin is in N. Virginia (Ashburn most likely), and you live in Tyler TX (location of the client). When you make a request, more than likely, it will hit the CDN POP (Point-of-Presence; basically where one of the Cloudflare servers are located) in Dallas or Houston (based on the networks and/or routing enhanced by Cloudflare's Argo) before it goes back to its origin. Getting a response is always faster from Dallas than Virginia, but in all honesty, it will be negligible. Now, let's say that you live in Liverpool UK. The request will be going to N. Virginia via the London Cloudflare POP. So the response is a lot faster from London than it is from Virginia, and that will be noticeable.
So distributed cache via a CDN always improves your site's speed. If it doesn't, then your rules and/or strategy may not be correct.
What is a cache strategy?
A caching strategy has two components, relationship & access:
- The relationship between the data, one's origin, the end user, and the caching systems, and
- How your data is accessed.
While we could discuss the various technical strategies (technically) like the look-aside, reading-through, writing-through, writing-around, writing-back, let's leave that for more enterprise and high-scale, high-volume sites that usually have teams or agencies building and maintaining their sites on enterprise-grade clouds (e.g., Google, AWS, Azure or IBM), and let's focus on the simple toolset that is offered via SiteGround.
With every request, there are three basic levels of cache (thinking linearly):
- Client Caching (AKA Browser Caching)
- Intermediate Caching (AKA CDN or Edge Caching)
- Origin Caching (AKA Backend Caching)
So it looks something like this:
Client Caching includes browser cache, local storage, application storage, service workers, web workers, etc. If something is cached here, there is very low latency and nothing leaves the client (e.g., browser, device).
Intermediate Caching includes any cache between the client and origin (think WordPress). In our case, this includes Cloudflare CDN. CDNs are generally read/write through caching that can also have look aside caches (which are usually only used at scale). The great thing about intermediate caching, especially CDNs, is that we can always override and ignore origin caching requests.
Backend/Origin Caching includes any cache that the backend uses for its services. In our case, this would include memcached, in-memory cache, and MySQL DB cache.
In this flow, the client would be a Chrome Browser on a desktop device or Safari Browser on a mobile device. The intermediate would be Cloudflare CDN and/or Sucuri/Cloudflare WAF. The origin would be NGINX, WordPress, memcached, and MySQL.
With caching, there are decisions made at each point:
- Do we want to cache at this location?
- What do we want to cache?
- How long should it be cached?
Caching can be dictated at every stage. At every stage, one can choose to ignore the caching recommendation or request made by the client request or origin response.
Consider this conceptual example: The browser could make a request saying, "Please don't send me anything cached," and the other client caches, intermediate cache, and backend cache would all decide whether to honor that request or not. Likewise, origin could respond saying, "Don't cache this," and the intermediate cache and client caches would decide whether to honor that request or not.
Now for a concrete example: By default, WordPress disables all cache for users who are logged into the site. In other words, every response sent out by WordPress for any user that is logged into the site, origin is saying, "Don't cache this." At Cloudflare, we can choose to ignore this and cache stuff regardless or we can do nothing and let WordPress have its way (even to its own detriment).
So in determining one's caching strategy, you have to determine where, what, and for how long you want to cache.
Where do we want to cache?
Where is the best place to cache stuff? Is it at origin? at the network edge (CDN)? or on the client? This somewhat depends on the what we are caching and why we are caching it. Generally speaking, we want to cache at every level.
You have the greatest control over your origin cache as that is your server. As you move closer to the end user, you have less control. CDNs control the shortest amount of time you are able to expire your cache based on your subscription level. Shortest Cache Times (also known as TTL - Time to Live) available by Cloudflare plans are:
- Free Plan: 2 hours
- Pro: 1 hour
- Business: 30 minutes
- Enterprise: 30 seconds
While you are able to set the browser cache, browsers have settings that allow users to ignore that cache, and users can clear their cache at any time. So the client cache is the least dependable cache there is.
What do we want to cache?
There are 2 basic types of assets: static and dynamic. Dynamic content can then be broken into three different types: general, segmented, and personalized.
- Static Assets (e.g., images, JS, CSS, HTML, JSON; think logo, jQuery, theme styles)
- Dynamic Assets (e.g., HTML, JSON)
- General Assets (e.g., HTML, JSON; think feeds, home page)
- Segmented Assets (e.g., HTML; think pages by role, WP Admin)
- Personalized Assets (e.g., HTML; think store cart, checkout page, user profile)
Now let's say you have an eCommerce site. By default those users who are logged-in purchasing or even just browsing your site are all bypassing your cache. So if you set to cache your entire site, you are now caching personalized content (e.g., the cart, checkout, invoice, account, etc.). So you have to exempt some pages from the cache, e.g., /cart/, /checkout/, /my-account/*, and /wp-admin/* pages.
To cache the WordPress admin or pages when users are logged into the site or their account, we can use (a.) custom code via nocache_headers and rest_send_nocache_headers, (b.) a setting with WP Rocket (see Caching Plugins above), or (c.) configuration in Cloudflare to cache the admin.
For how long do we want to cache?
The length of time of cache depends on the location of the cache and the location of the asset. In my approach of cacheAllTheThings();, even a short cache time (e.g., 30s or 1min) can help you out tremendously. Normally, you want to cache child items longer than parent items. For example, JS on a HTML page is cached longer than the HTML page itself as the JS asset is a child of the HTML asset.
Let's use a couple way-too-simple examples. As previously explained, we have three levels of cache: origin, edge, and browser.
Increasing Example:
- Origin Cache: 20min
- Edge Cache: 10min
- Browser Cache: 5min
When the browser cache expires (after 5min), it will get the same asset from the edge. When the browser cache expires again (after 10min), it will get the same asset from the origin setting the edge cache. When the browser cache expires again (after 15min), it will get the same asset from the edge, again. When the browser cache expires again (after 20min), it will get a new asset from origin.
Decreasing Example:
- Origin Cache: 5min
- Edge Cache: 10min
- Browser Cache: 15min
If we have decreasing length of time as we move to the origin, when the browser cache expires (after 15min), it will get a new asset from the origin immediately bypassing edge cache the first time the edge is hit. If the edge cache is warmed (say by another client), then when the browser cache expires, it will get a new asset from the edge cache.
Pyramid Example
- Origin Cache: 5min
- Edge Cache: 10min
- Browser Cache: 5min
If we have a pyramid length of time, when the browser cache expires (after 5min), it will get the same, cached asset from the edge. When the browser cache expires again (after 10min), it will get a fresh asset from origin immediately.
Help Determining Your Caching Strategy
Now that was way too much information! Did I confuse you more? Hopefully not. I am more than happy to consult with you on your caching strategy.
Finally, one key implementation is converting your site to a Progressive Web App (PWA). PWAs are websites the deliver an app-like experience, so they must be fast, reliable, engaging and responsive. Why spend the time investing converting your site into a PWA?
- PWA's run in the mobile browser.
- Not subject to app store reviews and approval processes.
- Can be launched from the home screen of mobile devices.
- Accessible across all platforms.
- Work offline.
- Increase your visits by 2-4x.
- Increase your conversions by 80%.
- Improve performance and decrease load time by 10-50%.
- Reduce your bounce rate.
All of these and more can be seen by reading the various Google Case Studies; namely, BookMyShow, ele.me, Jumia, Mynet, & Washington Post.
The best implementations are always a custom implementation, but you can get mostly there through one of these plugins:
- PWA
- PWA for WP & AMP
- PWA4WP
- Progressive WordPress
- Super Progressive Web Apps
- Add to Homescreen + Offline Shell + Offline Content + Web Push
- From CodeCanyon:
Summary
Sounds like a lot, but by doing all of these things, you now have a server that is truly serving your end customers. More than likely you won't want to do every little thing I recommend, but doing even a subset of these will improve your server's performance. There is no guarantee that doing only a subset of these will remove all 5XX errors from your site, but doing all of them will eradicate nearly 99% of those errors leaving only the errors that are truly a result of insufficient scale.
If you read this entire article, kudos! I really commend you as even writing this, I didn't want to read this entire article.
For your convenience, here is the outline of the entire article:
- Understanding 500 Errors
- Solving 500 Errors
- Understanding 499, 502, 503, & 504 Errors
- Understanding the Web Hosting Architecture
- What to Expect from Managed Hosting Support
- 15 Ways of Solving 499, 502, 503, & 504 Errors
- Analyze the Logs for 499s, 500s, 502s, 503s, & 504s
- Check PHP Version
- Run WP CLI’s Doctor Command
- Properly Configure a CDN
- Disable XMLRPC
- Control Bots
- Check Memory & Compute Utilization
- Configure Proper Cron Jobs
- Use Optimized Plugins
- Optimize the Database
- Offload All Emails
- Limit AJAX Usage
- Offload Images/Assets
- Analyze WP Actions & Filters
- Determine Cache Strategy
- Summary